Cranston Military Prints .com Home Page
Customer Helpline (UK) : 01436 820269
Subscribe to our Newsletter!

You currently have no items in your basket

Payment Options Display
Buy with confidence and security!
Publishing historical art since 1985


Navigation Menus
Military
Art Index
Aviation
Art Index
Naval
Art Index
Artists
Index
Product Search         
Aviation
History Archive
Naval
History Archive
HALF PRICE AND FREE PRINT SPECIAL OFFERS
ALWAYS GREAT OFFERS :
20% FURTHER PRICE REDUCTIONS ON HUNDREDS OF LIMITED EDITION ART PRINTS
BUY ONE GET ONE HALF PRICE ON THOUSANDS OF PAINTINGS AND PRINTS
FOR MORE OFFERS SIGN UP TO OUR FREE NEWSLETTER
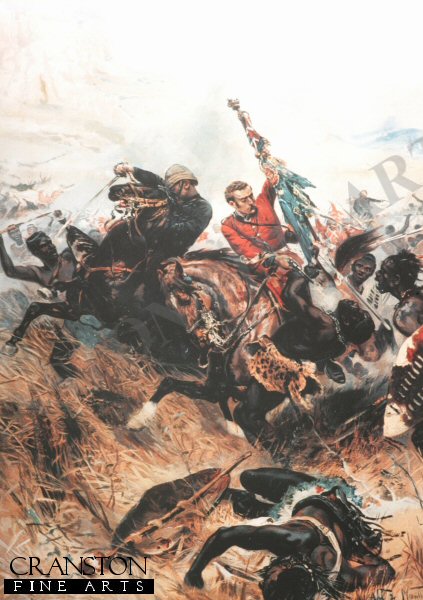
Last Stand of the 24th Regiment at the Battle of Isandhlwana by Simon Smith - Cranston Military Prints

Last Stand of the 24th Regiment at the Battle of Isandhlwana by Simon Smith


Last Stand of the 24th Regiment at the Battle of Isandhlwana by Simon Smith

Battle of Isandhlwana. Zulu victory over the British forces on 22nd January 1879 about 100km north of Durban. Lord Chelmsford led a column of forces to seek out the Zulu army camped at Isandhlwana, while patrols searched the district. After receiving a report, Chelmsford set forth at half strength, leaving six companies of the 24th Regiment, two guns, some Colonial Volunteers and a native contingent (in all about 1,800 troops) at the camp. Later that morning an advanced post warned of an approaching Zulu army. Shortly after this, thousands of Zulus were found hidden in a ravine by a mounted patrol but as the patrol set off to warn the camp, the Zulus followed. At the orders of the Camp Commander, troops spread out around the perimeter of the camp, but the Zulu army broke through their defences. The native contingent who fled during the attack were hunted down and killed. The remaining troops of the 24th Regiment, 534 soldiers and 21 officers, were killed where they fought. The Zulus left no one alive, taking no prisoners and leaving no wounded or missing. About 300 Africans and 50 Europeans escaped the attack. Consequently, the invasion of Zulu country was delayed while reinforcements arrived from Britain.
Item Code : DHM0280XXLast Stand of the 24th Regiment at the Battle of Isandhlwana by Simon Smith - Editions Available
DESCRIPTIONSIZESIGNATURESOFFERSPRICEPURCHASINGPACKS
Limited edition of 1000 prints. Image size 23 inches x 16 inches (58cm x 41cm)Artist : Simon Smith£25 Off!
Add any two items on this offer to your basket, and the lower priced item will be half price in the checkout!
Now : £95.00

Quantity:
In 3 Pairs
and 4 Packs
View
Limited edition of 50 artist proofs.Image size 23 inches x 16 inches (58cm x 41cm)Artist : Simon Smith£35 Off!
Add any two items on this offer to your basket, and the lower priced item will be half price in the checkout!
Now : £145.00

Quantity:
In 1 Pair
View
Limited edition of 50 giclee canvas prints. Image size 40 inches x 30 inches (102cm x 76cm)Artist : Simon Smith
(on separate certificate)
£100 Off!
Add any two items on this offer to your basket, and the lower priced item will be half price in the checkout!
Now : £600.00

Quantity:
Limited edition of 50 giclee canvas prints. Image size 30 inches x 20 inches (76cm x 51cm)Artist : Simon Smith
(on separate certificate)
£100 Off!
Add any two items on this offer to your basket, and the lower priced item will be half price in the checkout!
Now : £400.00

Quantity:
Limited edition of 1000 prints. Image size 23 inches x 16 inches (58cm x 41cm)Artist : Simon SmithHalf
Price!
Now : £60.00

Quantity:


Some other related items available from this site.

The painting shows Lieutenant T. Melville along with Lieutenant N J A Coghill attempting to Save the Queen's Colours of the 1/24th and fight their way out of the Battle of Isandhlwana.  Lieutenant Melville was the adjutant of the 1st Battalion, the 24th Foot.  Melville collected the Queen's Colours from the guard tent towards the end of the battle and rode out of camp heading for the Tugela River.  Melville arrived at the river, and due to the heavy rains the Tugela was in flood.  Melville rode into the river but about half way across came off his horse, still clutching the colours.  Lieutenant Coghill, also of the 24th Foot, crossed the river soon after and went to Melville's assistance.  The Zulus were on the bank and opened a heavy fire on them.  Lt Coghill's horse was killed and the colour swept away.  Both officers struggled to the Natal bank where it seems it is llikely that both men were killed by Natal natives.  The colours would later be recovered from the Tugela River.  Both officers would be later awarded the Victoria Cross.  The losses during the battle were 52 British officers and 806 non-commissioned ranks were killed and 471 Africans died fighting for the British.  Zulu warrior dead were around 2,000 dead either on the field or from wounds.  There were only around 60 Europeans survived the battle.

Saving the Queen's Colours by Alphonse de Neuville
By about 6pm the Zulu attacks had extended all around the front of the post, and fighting raged at hand-to-hand along the mealie-bag wall. Lieutenant Chard himself took up a position on the barricade, firing over the mealie-bags with a Martini-Henry, whilst Lieutenant Bromhead directed any spare men to plug the gaps in the line.  The men in the yard and on the front wall were dangerously exposed to the fire of Zulu marksmen posted in the rocky terraces on Shiyane (Oskarsberg) hill behind the post.  Several men were hit, including Acting Assistant Commissary Dalton, and Corporal Allen of the 14th.  Surgeon Reynolds treated the wounded as best he could despite the fire.  Once the veranda at the front of the hospital had been abandoned, the Zulus had mounted a determined attack on the building itself, setting fire to the thatched roof with spears tied with burning grass. The defenders were forced to evacuate the patients room by room, eventually passing them out through a small window into the open yard.  Shortly after 6pm Chard decided that the Zulu pressure was too great, and ordered a withdrawal to a barricade of biscuit boxes which had been hastily erected across the yard, from the corner of the store-house to the front mealie-bag wall. In this small compound the garrison would fight for their lives throughout most of the coming night.

Rorkes Drift 22nd January 1879 - Defending the Hospital by Jason Askew.
By about 6pm the Zulu attacks had extended all around the front of the post, and fighting raged at hand-to-hand along the mealie-bag wall. Lieutenant Chard himself took up a position on the barricade, firing over the mealie-bags with a Martini-Henry, whilst Lieutenant Bromhead directed any spare men to plug the gaps in the line. The men in the yard and on the front wall were dangerously exposed to the fire of Zulu marksmen posted in the rocky terraces on Shiyane (Oskarsberg) hill behind the post. Several men were hit, including Acting Assistant Commissary Dalton, and Corporal Allen of the 14th. Surgeon Reynolds treated the wounded as best he could despite the fire. Once the veranda at the front of the hospital had been abandoned, the Zulus had mounted a determined attack on the building itself, setting fire to the thatched roof with spears tied with burning grass. The defenders were forced to evacuate the patients room by room, eventually passing them out through a small window into the open yard. Shortly after 6pm Chard decided that the Zulu pressure was too great, and ordered a withdrawal to a barricade of biscuit boxes which had been hastily erected across the yard, from the corner of the store-house to the front mealie-bag wall. In this small compound the garrison would fight for their lives throughout most of the coming night.

Defence of Rorkes Drift, 22nd January 1879 by Alphonse de Neuville
On January 22nd 1879, during the Zulu War, the small British field hospital and supply depot at Rorkes Drift in Natal was the site of one of the most heroic military defences of all time.  Manned by 140 troops of the 24th Regiment, led by Lieutenant John Chard of the Royal Engineers, the camp was attacke by a well-trained and well-equipped Zulu army of 4000 men, heartened by the great Zulu victory over the British forces at Isandhlwana earlier on the same day.  The battle began in mid afternoon, when British remnants of the defeat at Isandhlwana struggled into the camp.  Anticipating trouble, Chard set his small force to guard the perimeter fence but, when the Zulu attack began, the Zulus came faster than the British could shoot and the camp was soon overcome.  The thatched roof of the hospital was fired by Zulu spears wrapped in burning grass and even some of the sick and the dying were dragged from their beds and pressed into the desperate hand-to-hand fighting.  Eventually, Chard gave the order to withdraw from the perimeter and to take position in a smaller compound, protected by a hastily assembled barricade of boxes and it was from behind this barricade that the garrison fought for their lives throughout the night.  After twelve hours of battle, the camp was destroyed, the hospital had burned to the ground, seventeen British lay dead and ten were wounded.  However, the Zulus had been repulsed and over 400 of their men killed.  The Battle of Rorkes Drift is one of the greatest examples of bravery and heroism in British military history.  Nine men were awarded Distinguished Conduct Medals, and eleven, the most ever given for a single battle, received the highest military honour of all, the Victoria Cross.

Defence of Rorkes Drift by Lady Elizabeth Butler.

Contact Details
Shipping Info
Terms and Conditions
Cookie Policy
Privacy Policy

Sign Up To Our Newsletter!

Stay up to date with all our latest offers, deals and events as well as new releases and exclusive subscriber content!

This website is owned by Cranston Fine Arts.  Torwood House, Torwoodhill Road, Rhu, Helensburgh, Scotland, G848LE

Contact: Tel: (+44) (0) 1436 820269.  Email: cranstonorders -at- outlook.com

Return to Home Page