Cranston Military Prints .com Home Page
Customer Helpline (UK) : 01436 820269
Subscribe to our Newsletter!

You currently have no items in your basket

Payment Options Display
Buy with confidence and security!
Publishing historical art since 1985


Navigation Menus
Military
Art Index
Aviation
Art Index
Naval
Art Index
Artists
Index
Product Search         
Aviation
History Archive
Naval
History Archive
HALF PRICE AND FREE PRINT SPECIAL OFFERS
ALWAYS GREAT OFFERS :
20% FURTHER PRICE REDUCTIONS ON HUNDREDS OF LIMITED EDITION ART PRINTS
BUY ONE GET ONE HALF PRICE ON THOUSANDS OF PAINTINGS AND PRINTS
FOR MORE OFFERS SIGN UP TO OUR FREE NEWSLETTER
Last Sleep of the Brave by Alphonse De Neuville - Cranston Military Prints

Last Sleep of the Brave by Alphonse De Neuville


Last Sleep of the Brave by Alphonse De Neuville

Scouts find the bodies of Melville and Coghill with the colours nearby. In fact, the Colours were lost in the river and were found later, both men were posthumously awarded the Victoria Cross. Lieutenant Melville was the adjutant of the 1st Battalion, the 24th Foot. Melville collected the Queen's Colours from the guard tent towards the end of the battle and rode out of camp heading for the Tugela River. Melville arrived at the river, and due to the heavy rains the Tugela was in flood. Melville rode into the river but about half way across came off his horse, still clutching the colours. Lieutenant Coghill, also of the 24th Foot, crossed the river soon after and went to Melville's assistance. The Zulus were on the bank and opened a heavy fire on them. Lt Coghill's horse was killed and the colour swept away. Both officers struggled to the Natal bank where it seems it is llikely that both men were killed by Natal natives.
Item Code : DHM0971XXLast Sleep of the Brave by Alphonse De Neuville - Editions AvailableExtra....

A photo of an edition of the print :

DESCRIPTIONSIZESIGNATURESOFFERSPRICEPURCHASINGPACKS
Open edition print. Image size 15 inches x 23 inches (38cm x 58cm)none£32 Off!Now : £28.00
Better Than
Half Price!

Quantity:
In 3 Pairs
and 2 Packs
View
Open edition print. Image size 8 inches x 12 inches (20cm x 31cm)none£6 Off!
Add any two items on this offer to your basket, and the lower priced item will be half price in the checkout!
Now : £10.00

Quantity:
Postcard Postcard size 6 inches x 4 inches (15cm x 10cm)none£2.50

Quantity:

and 2 Packs
View
Open edition print. Image size 15 inches x 23 inches (38cm x 58cm)none£35 Off!Now : £25.00
Better Than
Half Price!

Quantity:


Some other related items available from this site.

 After coming out of the British Square The 17th Lancers charge by the 58th Regiment. The Battle of Ulundi took place at the Zulu capital of Ulundi on 4th July 1879.  Ulundi became the last battle to be fought during the Zulu war and the British victory finally broke the military power of the Zulu Nation.  The battle began at 6 a.m. when Buller led out an advance guard of mounted troops and South African irregulars.  The British force comprised of five companies of the 80th regiment in square in four ranks, with two Gatling Guns in the centres, two 9-pounders on the left flank and two 7-pounders on the right. The 90th Light Infantry with four companies of the 94th regiment made up the left face with two more 7-pounders.  On the right face were the 1st Battalion of the 13th Light Infantry, four companies of the 58th Regiment, two 7-pounders and two 9-pounders. The rear face was composed of two companies of the 94th Regiment and two companies of the 2nd Battalion of the 21st Regiment.  In the middle of the square were headquarters staff, No. 5 company of the Royal Engineers whhich was led by Lt John Chard who had commanded the troops at Rorkes Drift, the 2nd Native Natal Contingent, fifty wagons and carts with reserve ammunition and hospital wagons. Bullers horsemen protected the front and both flanks of the square. A rearguard of two squadrons of the 17th Lancers and a troop of Natal Native Horse followed.  In total the British force stood at just over 5300 against the Zulu warrior regiments in total over 15000.  The Zulu warriors charged again and again at the square but with the strong British firepower of tifle and gatling gun, they could not get close.  As the Zulu warriors strength weakened, Lord Chelmsford ordered the cavalry to mount, and the 17th Lancers and the 1st Kings Dragoon Guards along with colonial cavalry were ordered to charge the now fleeing Zulus.  The Zulus fled towards the high ground with the cavalry in pursuit.  The Lancers were checked at the Mbilane stream by the fire of a concealed party of Zulus, causing a number casualties before the 17th Lancers overcame the Zulu resistance.  The pursuit continued until not one living Zulu remained on the Mahlabatini plain, with members of the Natal Native Horse, Natal Native Contingent and Woods Irregulars slaughtering the Zulu wounded, done in revenge for the massacre at Isandlwana.

Battle of Ulundi by Brian Palmer


Cape Mounted Rifles against Shakas Zulu Impis c.1827 by Chris Collingwood.
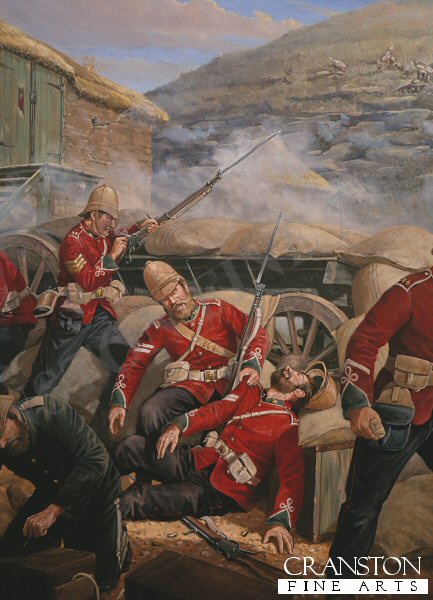
Corporal Allen and Corporal Lyons, B. Company 2nd Battalion 24th Foot Rorkes Drift Back Wall, 6pm January 22nd 1879.  After the initial Zulu assault on the back wall of the post failed at about 4.30pm, a fire-fight broke out between Zulu snipers posted on the terraces of the Shiyane (Oskarsberg) Hill and the defenders posted behind the barricade of wagons and mealie-bags. This section of the wall as commanded by Sergeant Henry Gallagher, of B Company. At about 6 pm, Corporal Lyons was leaning over the barricade to aim when he was hit in the neck by a bullet which paralysed him; as his friend, Corporal Allen, bent to help him, Allen too was shot through the arm. In the foreground Corporal Attwood of the Army Service Corps distributes ammunition. The wall was abandoned shortly after and the British retired to the small are in front of the storehouse. Allen was later awarded the VC, and Attwood the DCM.  He was born at Churcham, Gloucestershire, and served for five years in the Monmouthshire Militia before joining the 24th Regiment. He served through the Kaffir War 1877-8 before his bravery at Rorkes Drift for which he was presented with the Victoria Cross by Lord Wolseley on August 3rd 1879. He later served in the 1st Volunteers Battalion Royal Fusiliers.

Wounded by Mark Churms
 Defending the barracades, men of the 24th of Foot, or 2nd Warwickshire regiment (later in 1881 to become the South Wales Borderers) repel the massed Zulus attempting to smash through the mealie bag entrenchment. At the end of the battle, hundreds of the  Zulu warriors of the uThulwans, iNdlondo and uDloko regiments lay dead.  According to official figures the British lost 25 men, 11 Victoria crosses were awarded for the defence of Rorkes Drift.

Rorkes Drift January 22nd, 1879 by Stuart Liptrot

Contact Details
Shipping Info
Terms and Conditions
Cookie Policy
Privacy Policy

Sign Up To Our Newsletter!

Stay up to date with all our latest offers, deals and events as well as new releases and exclusive subscriber content!

This website is owned by Cranston Fine Arts.  Torwood House, Torwoodhill Road, Rhu, Helensburgh, Scotland, G848LE

Contact: Tel: (+44) (0) 1436 820269.  Email: cranstonorders -at- outlook.com

Return to Home Page