Cranston Military Prints .com Home Page
Customer Helpline (UK) : 01436 820269
Subscribe to our Newsletter!

You currently have no items in your basket

Payment Options Display
Buy with confidence and security!
Publishing historical art since 1985


Navigation Menus
Military
Art Index
Aviation
Art Index
Naval
Art Index
Artists
Index
Product Search         
Aviation
History Archive
Naval
History Archive
HALF PRICE AND FREE PRINT SPECIAL OFFERS
ALWAYS GREAT OFFERS :
20% FURTHER PRICE REDUCTIONS ON HUNDREDS OF LIMITED EDITION ART PRINTS
BUY ONE GET ONE HALF PRICE ON THOUSANDS OF PAINTINGS AND PRINTS
FOR MORE OFFERS SIGN UP TO OUR FREE NEWSLETTER
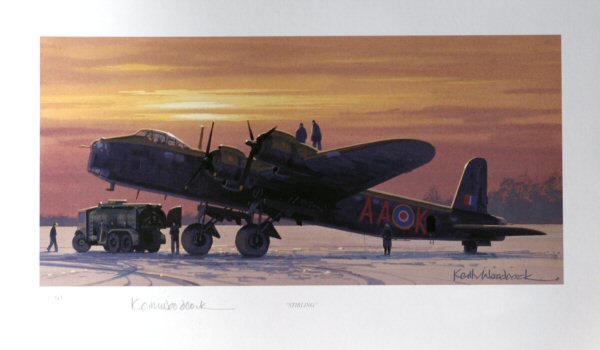
Stirling - The Heavy Brigade by Keith Woodcock. - Cranston Military Prints

Stirling - The Heavy Brigade by Keith Woodcock.


Stirling - The Heavy Brigade by Keith Woodcock.

The Royal Air Force Short Stirling used by bomber command during World War Two. This aircraft carries the code AA-K of No.75 Squadron.
Item Code : DHM2422BStirling - The Heavy Brigade by Keith Woodcock. - Editions AvailableExtra....

A photograph of the print :

At least four Stirlings carrying the code AA-K were lost during the war. These were :
R9316, lost 13th February 1943
EH902, lost 24th June 1943
EF501, lost 31st August 1943
and
EH955, lost 18th April 1944.

DESCRIPTIONSIZESIGNATURESOFFERSPRICEPURCHASINGPACKS
Signed limited edition of 500 prints. Image size 12 inches x 6 inches (31cm x 15cm)Artist : Keith WoodcockSOLD
OUT
NOT
AVAILABLE
Signed limited edition with extra aircrew signature. Image size 12 inches x 6 inches (31cm x 15cm)
Boards, Douglas
NO
PHOTO
AVAILABLE

Squadron Leader Douglas Boards, DFM
RAF 1941 - 1960
Signature Value : £15
CLICK HERE FOR FULL PROFILE

+ Artist : Keith Woodcock


Signature(s) value alone : £15
SOLD
OUT
NOT
AVAILABLE


Some other related items available from this site.

 The Short Stirling was the RAFs first four-engined bomber to enter service and it served throughout WWII in many roles including bomber, minelayer, troop carrier and glider-tug. The lack of power produced by its engines severely limited the loads carried by Stirlings. On long-range trips such as Italy, even with a greatly reduced bomb load the aircraft could barely clear the Alps. Despite very large losses due to its operational limitations, those that flew this big, agile aircraft, came to respect and look upon it with it with affection.

The Night Shift by Philip West.
MacRobert's Reply was the name given to a Short Stirling bomber of No 15 Squadron, serial N6086.  The Stirling was paid the donation of 25,000 pounds by Lady MacRobert in commemoration of her three sons, all of whom were killed whilst serving with the RAF.  The eldest son Alasdair died in a flying accident in 1938, whilst Roderick and Iain were both killed in action during 1941.  On October 1941 MacRobert's Reply was handed over to No.15 Squadron at RAF Wyton, with Lady MacRobert attending the naming ceremony.  The Stirling had the MacRobert coat of arms painted on the nose, and the code LS-F.  The Stirling flew twelve missions between October 1941 and January 1942, before accidentally swinging on take off and colliding with a damaged Spitfire at RAF Peterhead on 7th February 1942.  The aircraft was written off.

McRobert's Reply by Geoff Lea.
 Short Stirling N6086 <i>MacRobert's Reply</i>of 15 Sqn is shown during the bombing raid on the French Harbour of Brest on 18th December 1941.  British bombers had been dispatched to bomb the German battleships <i>Gneisenau</i> and <i>Scharnhorst</i> that were docked there, an action that earned N6086's skipper Fl Off Peter Boggis a DFC.  Stirling W7428 is also shown with her port wing ablaze, one of two Stirlings lost on this operation.  The subject of the RAF's attention can be seen amid the smoke - <i>Gneisenau</i> in drydock and <i>Sharnhorst</i> alongside.

MacRobert's Reply by Ivan Berryman.
 The Battle for Milne Bay in New Guinea was a story of true grit, determination, and valour; it was the moment when the Imperial Japanese Army tasted defeat on land for the first time in nearly three centuries. In the space of two weeks, the Japanese attempt to capture Milne Bay was halted, and any ambitions they might have held to invade Australia thwarted. And that victory was due in no small part to the Kittyhawks of 75 and 76 Squadrons RAAF. After the Japanese had invaded the north of New Guinea, their main objective was to take Port Moresby in the south.  But defeat at the Battle of the Coral Sea in May 1942 put an end to any invasion of Port Moresby by sea: instead they must strike across the Owen Stanley Ranges via the Kokoda Trail.  Protecting Port Moresbys eastern flank was the key strategic natural harbour at Milne Bay, and in June 1942 American engineers, protected by Australian troops, began construction of the first of three proposed airstrips to be hacked out of the steaming jungle.  Within a few weeks they had laid the first runway, formed by laying steel matting in almost impossible conditions.  With heavy rain falling almost continuously, it was an extraordinary feat.  Four days later the Kittyhawks of 75 and 76 Squadrons, RAAF, took up residence, together with a few Hudsons of 6 and 32 Squadrons to provide long-range reconnaissance.  On the night of 25th August 1942, in torrential rain, a Japanese invasion force began their landin in the bay.  With the Australian troops bitterly contesting every yard, the fighting was savage and bloody; conditions in the jungle battleground were wet, nuddy, and atrocious.  At first light the next morning the Kittyhawks and Hudsons immediately joined the battle, flying continuous raids against the Japanese forces.  Sortie after sortie, strafing and bombing the enemy troops, their landing barges and stores.  For the next eleven days the bitter battle raged, the Australian troops fighting in savage hand to hand combat as the Japanese were halted at No.3 airstrips permieter.  But eventually the Japanese were spent as a fighting force.  With no hope of reinforcement, they were forced to withdraw.  A quarter of their invasion force had been lost.  Robert Taylors powerful painting depicts Kittyhawks from 75 and & 76 Squadrons RAAF, returning to No 1 Strip after attacking Japanese positions during the Battle for Milne Bay. Under the starboard wing of the lead aircraft, Polly, the smoke of action is clearly visible as the Japanese press from their landing site, along the coast towards the airstrip. Polly, now beautifully restored, resides in the Australian War Memorial Museum in Canberra, a tribute to the men and machines who stopped the Japanese in New Guinea.

Milne Bay - The Turning Point by Robert Taylor.
Signatures on these products
*The value given for each signature has been calculated by us based on the historical significance and rarity of the signature and is for the unmatted version where available. Values of many pilot signatures have risen in recent years and will likely continue to rise as they become more and more rare.
NameInfo


Squadron Leader Douglas Boards, DFM
*Signature Value : £15

Editions signed :

Signed limited edition with extra aircrew signature.


Boards, Douglas
(Squadron Leader Douglas Boards, DFM)

RAF 1941 - 1960
Squadrons Related to This Print
No.75 Sqn RAAF
Aircraft Related to This Print
Stirling

Contact Details
Shipping Info
Terms and Conditions
Cookie Policy
Privacy Policy

Sign Up To Our Newsletter!

Stay up to date with all our latest offers, deals and events as well as new releases and exclusive subscriber content!

This website is owned by Cranston Fine Arts.  Torwood House, Torwoodhill Road, Rhu, Helensburgh, Scotland, G848LE

Contact: Tel: (+44) (0) 1436 820269.  Email: cranstonorders -at- outlook.com

Return to Home Page